23 KiB
IaC for metalisp.survey
About
This org file is part of the ml-survey repository. It is meant to be the infrastructure-as-code documentation.
Cloudinit
Introduction
This document explains the structure and content of our cloudinit.yml file,
which is used to initialize our AWS EC2 instance. The code blocks in this file
can be tangled to create the final cloudinit.yml file.
Cloud-Config Header
Every cloud-init file should start with "#cloud-config". This tells cloud-init that the file is a cloud-config file.
#cloud-configLocale and Keyboard Settings
Set the system locale and keyboard layout.
locale: en_US.UTF-8
keyboard:
  layout: us
Timezone Setting
Set the system timezone.
timezone: Europe/BerlinGroup Creation
Create any necessary system groups.
groups:
  - nginxgroup
User Creation and Configuration
Create and configure users. Here we're creating two users: a system user for Nginx and a regular user for administration.
  users:
  - name: nginxuser
    system: true
    shell: /usr/sbin/nologin
    groups: nginxgroup
    sudo: null
  # Create a new user named 'cl'
  - name: cl
    # Add the user to the 'users' and 'admin' groups
    groups: users, admin
    # Allow the user to execute any command with sudo without entering a password
    sudo: ALL=(ALL) NOPASSWD:ALL
    # Set the user's default shell to /bin/bash
    shell: /bin/bash
    # Add the user's public SSH key for key-based authentication
    ssh_authorized_keys:
      - ssh-ed25519 AAAAC3NzaC1lZDI1NTE5AAAAIJCknACoboXvy6C0DNVR+OI0Kb+YZkanh0B2pXLqbauV marcus@fw-linux-01
Package Installation
Install necessary packages.
packages:
  - detachtty
  - fail2ban
  - ufw
  - unattended-upgrades
  - sbcl
  - mosh
  - tmux
  - git
  - nginx
  - certbot
  - python3-certbot-nginx
  - build-essential
  - libzstd-dev
  - libsqlite3-dev
  - sqlite3
  - curl
  - wget

package_update: true
package_upgrade: true
File Writing
Write configuration files and scripts to the instance.
  write_files:
  # AUTO UPGRADES
  - path: /etc/apt/apt.conf.d/20auto-upgrades
    content: |
      APT::Periodic::Update-Package-Lists "1";
      APT::Periodic::Download-Upgradeable-Packages "1";
      APT::Periodic::AutocleanInterval "7";
      APT::Periodic::Unattended-Upgrade "1";
  # SSHD CONFIG
  - path: /etc/ssh/sshd_config
    content: |
      # Include additional configuration files from the specified directory
      Include /etc/ssh/sshd_config.d/*.conf
      # Set the maximum number of authentication attempts allowed per connection
      MaxAuthTries 3
      # Specifies the file containing public keys for user authentication
      AuthorizedKeysFile .ssh/authorized_keys
      # Disables password authentication
      PasswordAuthentication no
      # Specifies the authentication method(s) to use (public key authentication in this case)
      AuthenticationMethods publickey
      # Enables public key authentication
      PubkeyAuthentication yes
      # Disables root login via SSH
      PermitRootLogin no
      # Disables keyboard-interactive authentication
      KbdInteractiveAuthentication no
      # Enables the Pluggable Authentication Module (PAM) for authentication
      UsePAM yes
      # Disables agent forwarding for SSH connections
      AllowAgentForwarding no
      # Enables TCP forwarding for SSH connections
      AllowTcpForwarding yes
      # Disables X11 forwarding for SSH connections
      X11Forwarding no
      # Disables printing of the message of the day (MOTD) when a user logs in
      PrintMotd no
      # Specifies the key exchange algorithms to use
      KexAlgorithms curve25519-sha256@libssh.org
      # Specifies the ciphers allowed for protocol version 2
      Ciphers chacha20-poly1305@openssh.com
      # Specifies the message authentication code (MAC) algorithms in order of preference
      MACs hmac-sha2-512-etm@openssh.com
      # Specifies environment variables sent by the client to the server
      AcceptEnv LANG LC_*
      # Specifies the command to use for the SFTP subsystem
      Subsystem sftp /usr/lib/openssh/sftp-server
      # Specifies the user(s) allowed to log in via SSH (in this case, only the user "marcus")
      AllowUsers cl
  # FAIL2BAN
  - path: /etc/fail2ban/jail.local
    content: |
      [DEFAULT]
      # Ban time (in seconds) for an IP after reaching the max number of retries.
      bantime = 3600
      # Time window (in seconds) in which 'maxretry' failures must occur.
      findtime = 600
      # Maximum number of failed login attempts before an IP gets banned.
      maxretry = 3
      # Ban action to use (ufw in this case).
      banaction = ufw

      [sshd]
      # Enable the sshd jail.
      enabled = true
      # Specify the port for the sshd service.
      port = 22
      # Path to the log file for the sshd service.
      logpath = /var/log/auth.log

      [sshd-ddos]
      # Specify the filter to use (created earlier)
      filter = sshd
      # Enable the sshd-ddos jail.
      enabled = true
      # Specify the port for the sshd service.
      port = ssh
      # Path to the log file for the sshd service.
      logpath = /var/log/auth.log
      # Maximum number of failed login attempts before an IP gets banned (for DDoS protection).
      maxretry = 5
      # Ban time (in seconds) for an IP after reaching the max number of retries (for DDoS protection).
      bantime = 600

      [nginx-http-auth]
      # Enable the jail
      enabled = true
      # Specify the filter to use (created earlier)
      # filter = nginx-http-auth
      # Define the action to take (using UFW)
      action = ufw
      # Specify the log file to monitor
      logpath = /var/log/nginx/error.log
      # Set the maximum number of failed attempts before banning
      maxretry = 6
      # Set the ban time in seconds (1 hour)
      bantime = 3600
      # Set the time window for failed attempts in seconds (10 minutes)
      findtime = 600
  # NGINX CONF
  - path: /etc/nginx/nginx.conf
    content: |
      user nginxuser;
      worker_processes auto;
      pid /run/nginx.pid;
      include /etc/nginx/modules-enabled/*.conf;
      events {
        worker_connections 768;
        # multi_accept on;
      }
      http {
        ##
        # Basic Settings
        ##
        sendfile on;
        tcp_nopush on;
        types_hash_max_size 2048;
        # server_tokens off;
        # server_names_hash_bucket_size 64;
        # server_name_in_redirect off;
        include /etc/nginx/mime.types;
        default_type application/octet-stream;
        ##
        # SSL Settings
        ##
        ssl_protocols TLSv1.2 TLSv1.3; # Dropping SSLv3, ref: POODLE
        ssl_prefer_server_ciphers on;
        ##
        # Logging Settings
        ##
        log_format csv '$time_iso8601,$remote_addr,$remote_user,"$request",$status,$body_bytes_sent,$http_referer,"$http_user_agent"';
        access_log /var/log/nginx/access.csv csv;
        error_log /var/log/nginx/error.log;
        ##
        # Gzip Settings
        ##
        gzip on;
        # gzip_vary on;
        # gzip_proxied any;
        # gzip_comp_level 6;
        # gzip_buffers 16 8k;
        # gzip_http_version 1.1;
        # gzip_types text/plain text/css application/json application/javascript text/xml application/xml application/xml+rss text/javascript;
        ##
        # Dont send nginx version number
        ##
        server_tokens off;
        ##
        # Virtual Host Configs
        ##
        include /etc/nginx/conf.d/*.conf;
        include /etc/nginx/sites-enabled/*;
      }

  # Write reverse-proxy configuration file
  - path: /etc/nginx/sites-available/reverse-proxy.conf
    content: |
      # Listen on port 80
      server {
        listen 80;
        # Set your domain name
        server_name code.metalisp.dev;
        # Redirect all requests to HTTPS
        return 301 https://$host$request_uri;
      }

      # Listen on port 443 with SSL
      server {
        listen 443 ssl;
        # Set your domain name
        server_name code.metalisp.dev;

        # Include SSL certificate managed by Certbot
        ssl_certificate /etc/letsencrypt/live/$host/fullchain.pem;
        # Include SSL certificate key managed by Certbot
        ssl_certificate_key /etc/letsencrypt/live/$host/privkey.pem;
        # Include SSL options provided by Certbot
        include /etc/letsencrypt/options-ssl-nginx.conf;
        # Include DH parameters provided by Certbot
        ssl_dhparam /etc/letsencrypt/ssl-dhparams.pem;

        # Proxy settings for the location
        location / {
          # Set backend server address and port
          proxy_pass http://localhost:3000;
          # Set Host header
          proxy_set_header Host $host;
          # Set X-Real-IP header
          proxy_set_header X-Real-IP $remote_addr;
          # Set X-Forwarded-For header
          proxy_set_header X-Forwarded-For $proxy_add_x_forwarded_for;
          # Set X-Forwarded-Proto header
          proxy_set_header X-Forwarded-Proto $scheme;
        }
      }
Run Commands
Execute commands after the instance has been set up.
  runcmd:
  # Run Certbot to obtain SSL certificates and configure Nginx
  - certbot certonly --nginx -d code.metalisp.dev --non-interactive --agree-tos --email post@metalisp.dev --redirect
  # Add cron job for automatic certificate renewal (runs once a month)
  - echo '0 0 1 * * root certbot renew --post-hook "systemctl reload nginx" >> /var/log/letsencrypt/letsencrypt-auto-renew.log' > /etc/cron.d/letsencrypt-renew
  # Download DHPARAM

  # The Diffie-Hellman algorithm is used to establish a shared secret between two
  # parties (typically a client and a server) over a public channel, and is a
  # fundamental part of many cryptographic protocols, including HTTPS.

  # However, generating Diffie-Hellman parameters can be computationally expensive,
  # so pre-generated parameters are often used. Mozilla provides such pre-generated
  # parameters, and they are considered to be trustworthy.

  # The downloaded parameters are saved in a file named ssl-dhparam.pem in the
  # /etc/letsencrypt directory. This file is then referenced in the configuration
  # of services that use Diffie-Hellman key exchange, such as your Nginx server, to
  # establish secure communications.

  # This step is part of a broader effort to set up SSL/TLS securely on your
  # server, enhancing the security of your connections.

  - curl https://ssl-config.mozilla.org/ffdhe2048.txt > /etc/letsencrypt/ssl-dhparam.pem
  # Create a symlink for the configuration file
  - ln -s /etc/nginx/sites-available/reverse-proxy.conf /etc/nginx/sites-enabled/
  # Remove default Nginx configuration
  - rm /etc/nginx/sites-enabled/default
  # Reload Nginx configuration
  - systemctl reload nginx
  # Allow Nginx Full (HTTP and HTTPS) through the firewall
  - ufw allow 'Nginx Full'
  - ufw default deny incoming
  - ufw default allow outgoing
  - ufw allow 22/tcp
  - ufw allow mosh
  - ufw enable
  - systemctl enable fail2ban && systemctl start fail2ban
  - systemctl restart sshd
Conclusion
This concludes the documentation for our cloudinit.yml file. To generate the actual YAML file from this Org document, you can use the following Emacs command:
C-c C-v t
Or in an Org-mode babel shell block:
(org-babel-tangle)
This will create the cloudinit.yml file with all the code blocks in the correct order and with proper indentation.
Remember to review the generated YAML file to ensure all indentations are correct, as YAML is sensitive to indentation.
Terraform and AWS
Introduction
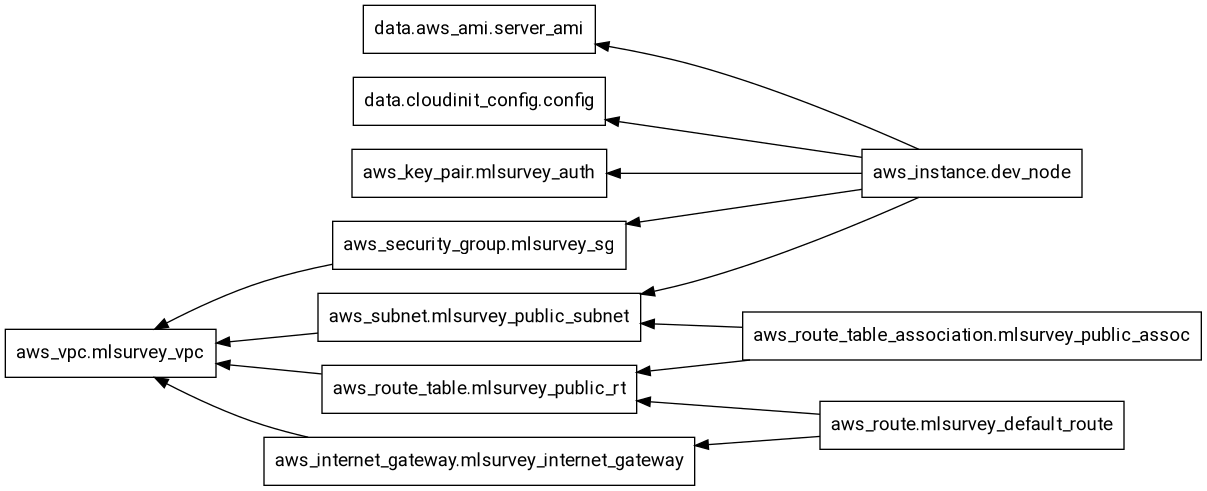
This tutorial will guide you through creating a main.tf file for setting up
basic AWS infrastructure using Terraform. We'll explain each resource, why it's
necessary, and the order in which they should be created. The code blocks in
this file can be tangled to create the final main.tf file.
terraform graph terraform graphdigraph G {
rankdir = "RL";
node [shape = rect, fontname = "sans-serif"];
"data.aws_ami.server_ami" [label="data.aws_ami.server_ami"];
"data.cloudinit_config.config" [label="data.cloudinit_config.config"];
"aws_instance.dev_node" [label="aws_instance.dev_node"];
"aws_internet_gateway.mlsurvey_internet_gateway" [label="aws_internet_gateway.mlsurvey_internet_gateway"];
"aws_key_pair.mlsurvey_auth" [label="aws_key_pair.mlsurvey_auth"];
"aws_route.mlsurvey_default_route" [label="aws_route.mlsurvey_default_route"];
"aws_route_table.mlsurvey_public_rt" [label="aws_route_table.mlsurvey_public_rt"];
"aws_route_table_association.mlsurvey_public_assoc" [label="aws_route_table_association.mlsurvey_public_assoc"];
"aws_security_group.mlsurvey_sg" [label="aws_security_group.mlsurvey_sg"];
"aws_subnet.mlsurvey_public_subnet" [label="aws_subnet.mlsurvey_public_subnet"];
"aws_vpc.mlsurvey_vpc" [label="aws_vpc.mlsurvey_vpc"];
"aws_instance.dev_node" -> "data.aws_ami.server_ami";
"aws_instance.dev_node" -> "data.cloudinit_config.config";
"aws_instance.dev_node" -> "aws_key_pair.mlsurvey_auth";
"aws_instance.dev_node" -> "aws_security_group.mlsurvey_sg";
"aws_instance.dev_node" -> "aws_subnet.mlsurvey_public_subnet";
"aws_internet_gateway.mlsurvey_internet_gateway" -> "aws_vpc.mlsurvey_vpc";
"aws_route.mlsurvey_default_route" -> "aws_internet_gateway.mlsurvey_internet_gateway";
"aws_route.mlsurvey_default_route" -> "aws_route_table.mlsurvey_public_rt";
"aws_route_table.mlsurvey_public_rt" -> "aws_vpc.mlsurvey_vpc";
"aws_route_table_association.mlsurvey_public_assoc" -> "aws_route_table.mlsurvey_public_rt";
"aws_route_table_association.mlsurvey_public_assoc" -> "aws_subnet.mlsurvey_public_subnet";
"aws_security_group.mlsurvey_sg" -> "aws_vpc.mlsurvey_vpc";
"aws_subnet.mlsurvey_public_subnet" -> "aws_vpc.mlsurvey_vpc";
}
# This file configures the providers used in this Terraform configuration.
# Providers are plugins that Terraform uses to manage resources.

terraform {
  # Specify the required providers and their versions
  required_providers {
    # AWS provider for managing AWS resources
    aws = {
      source  = "hashicorp/aws" # Source of the provider
      version = "~> 4.16"       # Version constraint for the provider
    }
    # Cloud-init provider for generating cloud-init configs
    cloudinit = {
      source  = "hashicorp/cloudinit"
      version = "~> 2.2.0"
    }
  }
  # Specify the required version of Terraform itself
  required_version = ">= 1.2.0"
}

# Configure the AWS Provider
provider "aws" {
  region                   = "eu-central-1"         # Specify the AWS region to use
  shared_credentials_files = ["~/.aws/credentials"] # Path to the AWS credentials file
}

# Configure the cloudinit Provider
# No specific configuration needed for cloudinit, but declaring it here makes it available for use
provider "cloudinit" {}
Define Global Variables
  variable "host_os" {
    type = string
    default = "windows"
  }
host_os = "windows"Virtual Private Cloud (VPC)
We start with creating a VPC, which is a virtual network dedicated to your AWS account. It's the foundation for all other resources.
resource "aws_vpc" "mlsurvey_vpc" {
  cidr_block           = "10.0.0.0/16"
  enable_dns_hostnames = true
  enable_dns_support   = true
  tags = {
    Name = "ml-survey-vpc"
  }
}
This VPC:
- Has a CIDR block of 10.0.0.0/16, allowing for up to 65,536 IP addresses.
- Enables DNS hostnames and support, which are necessary for EC2 instances to have DNS names.
Subnet
Next, we create a subnet within our VPC. Subnets allow you to partition your network to group resources together.
resource "aws_subnet" "mlsurvey_public_subnet" {
  vpc_id                  = aws_vpc.mlsurvey_vpc.id
  cidr_block              = "10.0.1.0/24"
  map_public_ip_on_launch = true
  availability_zone       = "eu-central-1a"
  tags = {
    Name = "ml-survey-public"
  }
}
This subnet:
- Is associated with our VPC.
- Has a CIDR block of 10.0.1.0/24, allowing for up to 256 IP addresses.
- Automatically assigns public IP addresses to instances launched in it.
- Is located in the eu-central-1a availability zone.
Internet Gateway
An Internet Gateway allows communication between your VPC and the internet.
resource "aws_internet_gateway" "mlsurvey_internet_gateway" {
  vpc_id = aws_vpc.mlsurvey_vpc.id
  tags = {
    Name = "ml-survey-igw"
  }
}
This Internet Gateway is attached to our VPC, enabling internet access for resources within the VPC.
Route Table
A route table contains a set of rules (routes) that determine where network traffic is directed.
resource "aws_route_table" "mlsurvey_public_rt" {
  vpc_id = aws_vpc.mlsurvey_vpc.id
  tags = {
    Name = "ml-survey-rt"
  }
}
This route table is associated with our VPC and will contain the rules for routing traffic.
Route
We add a route to our route table to direct internet-bound traffic to the Internet Gateway.
resource "aws_route" "mlsurvey_default_route" {
  route_table_id         = aws_route_table.mlsurvey_public_rt.id
  destination_cidr_block = "0.0.0.0/0"
  gateway_id             = aws_internet_gateway.mlsurvey_internet_gateway.id
}
This route sends all traffic (0.0.0.0/0) to the Internet Gateway, allowing resources in our VPC to access the internet.
Route Table Association
We associate our route table with the subnet to apply the routing rules.
resource "aws_route_table_association" "mlsurvey_public_assoc" {
  subnet_id      = aws_subnet.mlsurvey_public_subnet.id
  route_table_id = aws_route_table.mlsurvey_public_rt.id
}
This association ensures that the routing rules apply to resources in our subnet.
Security Group
A security group acts as a virtual firewall for your instance to control inbound and outbound traffic.
resource "aws_security_group" "mlsurvey_sg" {
  name        = "ml-survey-sg"
  description = "ml-survey security group"
  vpc_id      = aws_vpc.mlsurvey_vpc.id

  ingress {
    from_port   = 0
    to_port     = 0
    protocol    = "-1"
    cidr_blocks = ["0.0.0.0/0"]
  }

  egress {
    from_port   = 0
    to_port     = 0
    protocol    = "-1"
    cidr_blocks = ["0.0.0.0/0"]
  }
}
This security group allows all inbound and outbound traffic. In a production environment, you would typically restrict this for better security.
Key Pair
A key pair is used to securely SSH into your EC2 instances.
resource "aws_key_pair" "mlsurvey_auth" {
  key_name   = "ml-survey-key"
  public_key = file("~/.ssh/ml-survey-key.pub")
}
This resource uploads your public key to AWS, allowing you to use the corresponding private key to SSH into instances.
EC2 Instance
This file defines data sources, which fetch and compute information for use in other parts of your Terraform configuration.
This data source processes the cloud-init configuration file (cloudinit.yml) for use with EC2 instances.
data "cloudinit_config" "config" {
  gzip          = true # Compress the cloud-init data to save space
  base64_encode = true # Encode the data in base64 for proper transmission to EC2

  part {
    content_type = "text/cloud-config"                  # Specify that this is a cloud-config file
    content      = file("${path.module}/cloudinit.yml") # Read the content of the cloudinit.yml file
  }
}
Amazon Machine Image (AMI) Lookup
This data source finds the latest Ubuntu 22.04 LTS AMI for use with EC2 instances.
data "aws_ami" "server_ami" {
  most_recent = true             # Get the most recent version of the AMI
  owners      = ["099720109477"] # This ID represents Canonical, the company behind Ubuntu

  # Filter to find Ubuntu 22.04 LTS (Jammy Jellyfish) AMIs
  filter {
    name   = "name"
    values = ["ubuntu/images/hvm-ssd/ubuntu-jammy-22.04-amd64-server-*"]
  }

  # Ensure we're getting a hardware virtual machine (HVM) AMI
  filter {
    name   = "virtualization-type"
    values = ["hvm"]
  }

  # Specify that we want an x86_64 architecture (suitable for t2.micro instances)
  filter {
    name   = "architecture"
    values = ["x86_64"]
  }
}
Finally, we create an EC2 instance, which is a virtual server in Amazon's Elastic Compute Cloud (EC2) for running applications.
resource "aws_instance" "dev_node" {
  instance_type               = "t2.micro"
  ami                         = data.aws_ami.server_ami.id
  key_name                    = aws_key_pair.mlsurvey_auth.id
  vpc_security_group_ids      = [aws_security_group.mlsurvey_sg.id]
  subnet_id                   = aws_subnet.mlsurvey_public_subnet.id
  user_data                   = data.cloudinit_config.config.rendered
  user_data_replace_on_change = true
  tags = {
    Name = "dev-node"
  }
}
This EC2 instance:
- Uses the t2.micro instance type.
- Uses the AMI specified in the
aws_amidata source. - Uses the key pair we created for SSH access.
- Is placed in our VPC and subnet.
- Has the security group we created applied to it.
- Uses the cloud-init configuration we specified.
Output
Lastly, we add an output to display the public IP of our instance.
  output "dev_node_public_ip" {
    value = aws_instance.dev_node.public_ip
  }
This output will be displayed after Terraform applies the configuration, making it easy to find the IP address of your new instance.
Conclusion
By tangling all these code blocks, you'll have a complete main.tf file that
sets up a basic AWS infrastructure. The resources are created in a logical
order, with each building upon the previous ones to create a fully functional
network and compute environment in AWS.